 Choose a tartan by clan. Clans and large families of Scottish beginning often have their very own tartan habits since the early 1800s. It is possible to use a clan design only when your loved ones has actually existing or ancestral ties compared to that clan.
- Learn which clan you are part of. As long as you understand your surname or a surname attached to Scottish forefathers, searching online for your clan title. Searching for the clan name here:
- Locate details about your clan. Once you know your clan title, you'll look-up more info about your clan in order to learn the tartan design or patterns related to it. Look-up your clan right here:
- Older, more conventional options include searching Stewart, Black Watch, Caledonian, and Jacobite.
- Modern universal options consist of Scottish National, Brave Heart Warrior, Flower of Scotland and Pride of Scotland.
 Part 2
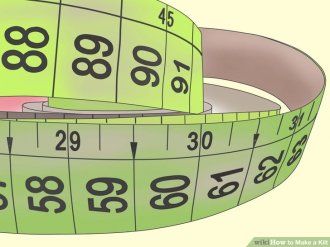
- Just take hip and waist dimensions. Take a tape measure and measure the distance around both your hips along with your waist. These dimensions will determine exactly how much product you may need for the kilt.
- For ladies, measure across the thinnest section of your waist together with widest element of your sides.
- For males, measure around the upper side of your hip bones in addition to widest part of your buttocks.
- Whenever using measurements, ensure the tape measure is tight and parallel towards ground.
- Determine along the kilt. A conventional kilt size will equal the distance between your waist towards mid-knee. Utilize a tape measure to calculate this length.
- In the event that you intend to wear a broad kilt gear over your kilt, you need to add 2 inches (5 cm) for this dimension for a high-rise waistline.
- Determine exactly how much product you want. Because you want to form pleats out of your product, you'll need a much greater amount of product than the length around your waist.
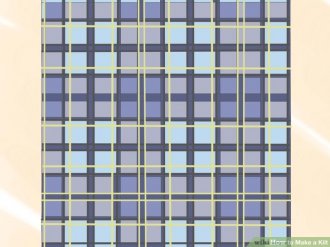
- Gauge the width associated with "sett" or pattern from the plaid or tartan material. Each pleat will contains the full sett with 1 inches (2.5 cm) of exposed pleat. In other words, if setts on the material tend to be 6 ins (15.25 cm) wide, each pleat use 7 ins (17.75 cm).
- Determine the actual quantity of product you need by multiplying half of your hip dimension by the level of material needed for each pleat, and add this value to your full hip measurement. Include yet another 20 per cent for additional pleating and centering to obtain your final amount of ins required. Divide this worth by 72 to determine exactly how many yards you may need at dual width.
- Hem the materials, if required. Pin the most effective and bottom edges of material down, ensuring that you fold from the exterior edge of a sett on both ends. Sew the hems in place with a straight stitch or utilize an anti-fraying glue fluid regarding the edges.
- This may not be required if the material has a finished side at the very top and bottom.
 Part 3
- Make the very first pleat. 1st pleat may help focus the materials, therefore it find yourself being some not the same as one other pleats.
- Fold about 6 inches (15.25 cm) of material underneath itself on right side of this material. Pin positioned during the waistline.
- Regarding remaining side of the material, make a pleat that encompasses two setts. Secure with a safety pin in the waistline.
- Measure out your pleats. On an item of cardboard or durable cardstock, level the width of just one sett. Divide this noticeable area into three to eight equal parts.
- Make use of your best judgment to determine how many components to divide the pattern into. The guts area will peek through pleat, which means that your center section will include an attractive the main pattern.
- Pleat the remaining of this outside apron. Lay your cardboard guide above each sett while you fold it. Overlay the folded side of each pleat throughout the part of the design that suits it within the set alongside it. Protected set up with a safety pin.
- The cardboard guide should supply an idea of where to fold your first couple of pleats. After you begin folding, but you could find that you do not require the guide because it should become an easy matter of matching the patterns collectively.
- Baste the pleats across the base of this product. Make use of a running stitch to capture the side of each pleat, holding it positioned in the bottom of the product.
- You ought to do two rows of basting. 1st flowing stitch should be about 1/4 of the length up from the bottom associated with the material, as well as the second should really be about 1/2 for the amount of through the bottom.
- Iron the pleats flat. Utilize an iron with a vapor setting to hit the pleats set up, making them stronger and helping the pleats keep their particular form. Iron along each folded edge of each pleat.
- If the metal cannot use vapor, you are able to moisten a thin pressing cloth and place it across pleats. Put this pressing cloth in the middle the iron and also the material of the kilt and steam-press the pleats in this way.
- Sew the pleats down. Sew across the whole width of pleats and down each pleat across the fold.
- Sew a straight stitch with your sewing-machine throughout the top of pleats, roughly 1 inches (2.5 cm) from the upper side.
- Sew a straight stitch along with your sewing-machine over the creased, ironed vertical edge of each pleat. Just sew about 4 inches (10 cm) of product. Do not sew all the way down each pleat.
- Trim the rear of the pleats. This pleating technique can result in excess product, to help you trim this product down.
- Cut away extra material through the part beginning 1 inch (2.5 cm) over the hipline and ending at waistline. Try not to cut-away product from first and final pleats.
Component 4
Including a Waistband- Cut a bit of matching product for waistband. The material ought to be 5 inches (12.7 cm) wide additionally the size should match along the very best edge of your kilt apron.
- This will be only a little longer than your preliminary waist dimension.
- Stitch the waistband toward top edge of the outside apron. Change the underside edge of the waistband product under 1/2 inches (1.27 cm). Sew this folded advantage 1 inch (2.5 cm) from the top side of the kilt apron, on the outside.
- The residual width associated with the waistband should be collapsed outrageous of kilt. You don't need in order to complete it since the liner will cover the natural edges.

Source: www.wikihow.com
Share this Post
latest post
-
 KILT FM Radio Houston June 25, 2026
 -
 Scotland Dance June 19, 2026
 -
 Kilt Outfits June 13, 2026
 -
 Camo Kilt June 7, 2026
 -
 Barn Dance Steps June 1, 2026
 -
 Virginia Reel Call May 26, 2026
 -
 Kilt Hire Slaters May 20, 2026
 -
 MacKenzie Kilts May 14, 2026
 -
 Scottish Rock Songs May 8, 2026