
 A knife pleat appears dangerous, it is really one of several easiest and, we believe, prettiest people in the pleat family members. In a knife pleat, the folds tend to be pressed to one part in identical direction, which explains why also they are often known as side pleats. More than likely, you've seen blade pleats on a garment; like those great tartan kilts bag pipers are recognized to wear... with or without something underneath.
Utilizing a pleat, aside from kind, is a method to gather textile to create fullness. The thing is that the method usually on garments, predominately skirts. But's a good alternative as a border result along the hemline of a garment or just around a pillow. Pleats tend to be eternal, and certainly will be adapted to any particular task. The ensuing artistic effect becomes a true focus, using the task to the next level.
The type of fabric you decide on is an important aspect in both the crispness of your pleats plus the size. All-natural fiber fabrics lend themselves more straightforward to pleats than their artificial alternatives. Materials like cotton, wool or silk will hold pleats whenever pressed. Artificial fabrics require more strive to hold pleats set up.
Furthermore, the extra weight of the chosen material can also be a factor. Finer fabrics, such as handkerchief linen are best for narrow pleats where bulk is certainly not an issue. More substantial fat textiles, such as for example wool are better fitted to wide pleats.
If you should be staying away from a pattern with fabric suggestions, how will you know what dimensions to create your pleats? We recommend testing a sample of your textile with markings at different periods to see what appears better to you. Focus on a 1" fold and increase or down after that.
 The blade pleat is considered is the standard pleat. You produce a fold in textile at a predetermined width, and press in one course regarding the right-side of this fabric. Unlike other types of pleats, knife pleats constantly travel in a gang. Just one or two will be considered more a tuck than a pleat. Because you will work in multiples, you need to mark your material really accurately.
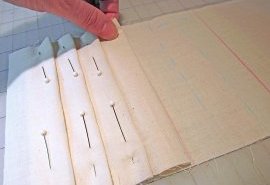
To begin, you wish to have the proper tagging tool for your fabric. This is often easier said than done, but don't worry, we're here to guide you. Your preferred sewing offer merchant will most likely have quite an array of textile tagging pencils, pencils, chalks, etc. How you determine that may perform best? Take to them on fabric scraps! The ultimate goal is two-fold; one, you need to be able to begin to see the mark on your selected fabric, meaning a dark line on light fabric and a light line on darks; and two, you must make sure the scars can easily be taken off your chosen textile. It's wise having some different types of tagging resources to pick from within sewing basket, because usually one type works more effectively using one textile than another. Under is an image of a few associated with marking resources we now have in the S4H studio.
Guide lines for blade pleats eventually need appear on the right side of fabric. Depending on the material kind, marking device, and/or project, you may have to draw your scars in the wrong part then make use of bond basting to see all of them from the right side. Or, you may be able to just mark the pleat lines in the right side. The following, we explain to you tips do both.
NOTE: If you're utilizing a commercial pattern, it is important to just take included measures to mark your material because you will have the paper design between both you and the fabric. You can use many different methods which might feature a tracing wheel and transfer paper, pin markings, and/or clipping at the fabric edge. The key is not to move the structure piece way too much whilst not to skew the keeping the pleats.
 Marking regarding the right-side only
- The markings for many pleats, aside from type, have two-fold lines: one when it comes to external fold and one for the interior fold. Along with both of these outlines, you also have a placement line and quite often little arrows that time into the course you can expect to fold or press the pleats. In the event that you examine a commercial design, the fold line is usually a dotted line together with placement range is an excellent. If you should be following a tutorial or designing one thing your self, we recommend making use of an identical method.
NOTE: within instance below, the pleats are 1" wide, this means we mark the fold lines 1" apart, and placement range 1" from the inside fold line. Continue doing this procedure generally there is a line marking every inches. This same structure could be followed if the pleats tend to be larger or smaller. The important thing is hold all your valuable outlines even. - Spot your material RIGHT side on a-flat area adequate for your material piece.
- Working on the proper region of the material, usage a tagging device and ruler to mark the fold lines with dotted lines therefore the placement lines (where the fold will likely be pressed level) with solid outlines. If you want extra help to separate between your two, you need to use two different colors.
NOTE: Some professionals recommend making tiny snips in side of the fabric on fold outlines and positioning lines as well as tagging. - Transfer the pleated panel towards work board for pressing (we now have some records on pressing below).
Marking regarding the wrong side with basting bond
- Often, you just cannot mark through the front without destroying any project. In this situation, it is possible to mark from the back and use basting thread to create guide outlines you can see from front.
- Put your material WRONG part up on a flat surface large enough for your textile piece.
- After the exact same steps as above for tagging in the front side, create any tips in the wrong region of the material.
Marking pleats farther aside
If you should be wondering exactly how knife pleats would look spaced farther aside, we are able to demonstrate! To get this done, just leave much more room between the positioning range and the outside fold line of another pleat.
Within our example below, we spread the pleats 2" apart.
After you've spent the full time to pleat your material, you certainly cannot wish the pleats become comprised. Placing pins at either end associated with pleat across the natural edges, and some pins in the middle when your pleats can be long, will help maintain the fabric in place until you get it over to the ironing board.
Once at the ironing board, it is never ever a smart idea to push your fabric with pins inside it! Therefore, get rid of the pins while you gradually push your pleated folds. But, let's say you've got a sizable little bit of fabric? Simply pin the fabric to your your work board cover.
Another information to take into account whenever pressing pleats is whether or perhaps not the pressed textile folds will leave an indentation in your textile. If you are using a pressing a cloth, or brown paper, in between the folds while you press them, it will help eliminate indents.


RELATED VIDEO


Share this Post
latest post
-
 KILT FM Radio Houston June 25, 2026
 -
 Scotland Dance June 19, 2026
 -
 Kilt Outfits June 13, 2026
 -
 Camo Kilt June 7, 2026
 -
 Barn Dance Steps June 1, 2026
 -
 Virginia Reel Call May 26, 2026
 -
 Kilt Hire Slaters May 20, 2026
 -
 MacKenzie Kilts May 14, 2026
 -
 Scottish Rock Songs May 8, 2026